# Igor Luchenkov
> Personal blog of Igor Luchenkov, a staff software engineer. Full text of every article follows.
---
# Do not write Storybook tests manually, do this instead!
Source: https://igorluchenkov.com/blog/storybook-test-codegen
[Storybook](https://storybook.js.org/docs) is one of the best tools for building client components. It allows us to create UI in isolation, document it, and even cover it with [automated tests](https://storybook.js.org/docs/7/writing-tests/interaction-testing).
I explained why automated tests are worth pursuing in [Why You MUST Have Automated Tests](https://hackernoon.com/stable-software-learn-about-the-power-of-automated-tests). In this post, we'll go deeper into how to write them efficiently with Storybook.
## Let's write a test
We have a form with an email, password fields and a submit button. The user enters their credentials, submits the form and sees the confirmation message. Here is what the form looks like:
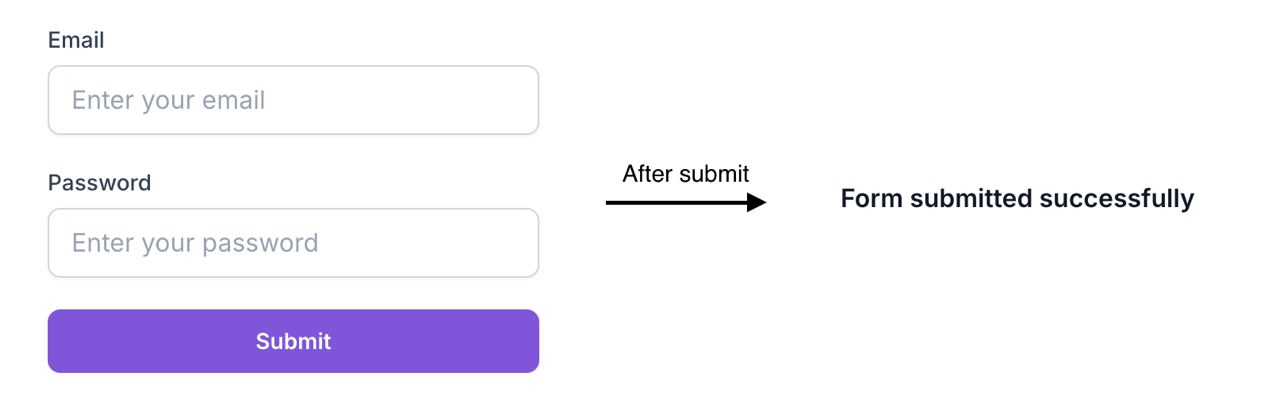
And this is the HTML structure of the form:
```html
```
### How to test?
Here are the steps we need to take to write a test for this story:
* Pick an element to interact with.
* Find a user-friendly selector for it (e.g. by aria-role, label, placeholder, text, title, test-id) according to [Testing Library's guiding principles](https://testing-library.com/docs/guiding-principles/).
* Write the interaction code (e.g. `userEvent.click(selector)`)
* Return to step 1 to perform the next interaction until the test is ready.
### The actual test
There are four elements to interact with. Here is how we can do it:
* Email and password:
* Both fields use an `input` tag, which translates to `role=textbox` in Testing Library. They also have a ``, which we will use to narrow the element selection.
* We will click on the field to focus it and then type in the value.
* The submit button is a `button` element, which translates to `role=button` in Testing Library. The text on the button is `Submit`, we will also use it to narrow down the selection.
* The confirmation message is a simple text, which we can select by its content.
With all that said, we get the code like this:
```javascript
play: async ({ canvasElement }) => {
const canvas = within(canvasElement);
// Click and type in the email field
await userEvent.click(canvas.getByRole('textbox', { name: 'Email' }));
await userEvent.type(canvas.getByRole('textbox', { name: 'Email' }), 'example@gmail.com');
// Click and type in the password field
await userEvent.click(canvas.getByRole('textbox', { name: 'Password' }));
await userEvent.type(canvas.getByRole('textbox', { name: 'Password' }), 'secret-password');
// Submit the form
await userEvent.click(canvas.getByRole('button', { name: 'Submit' }));
// Assert that the confirmation message is displayed
expect(canvas.getByText('Form submitted successfully')).toBeInTheDocument();
}
```
It does the job, but writing it is a lot of work. What if there are more steps to take? What if the form is more complex?
## Making it easier
What if all of this was done for you? Presenting: [Storybook Test Codegen Addon](https://www.npmjs.com/package/storybook-addon-test-codegen).
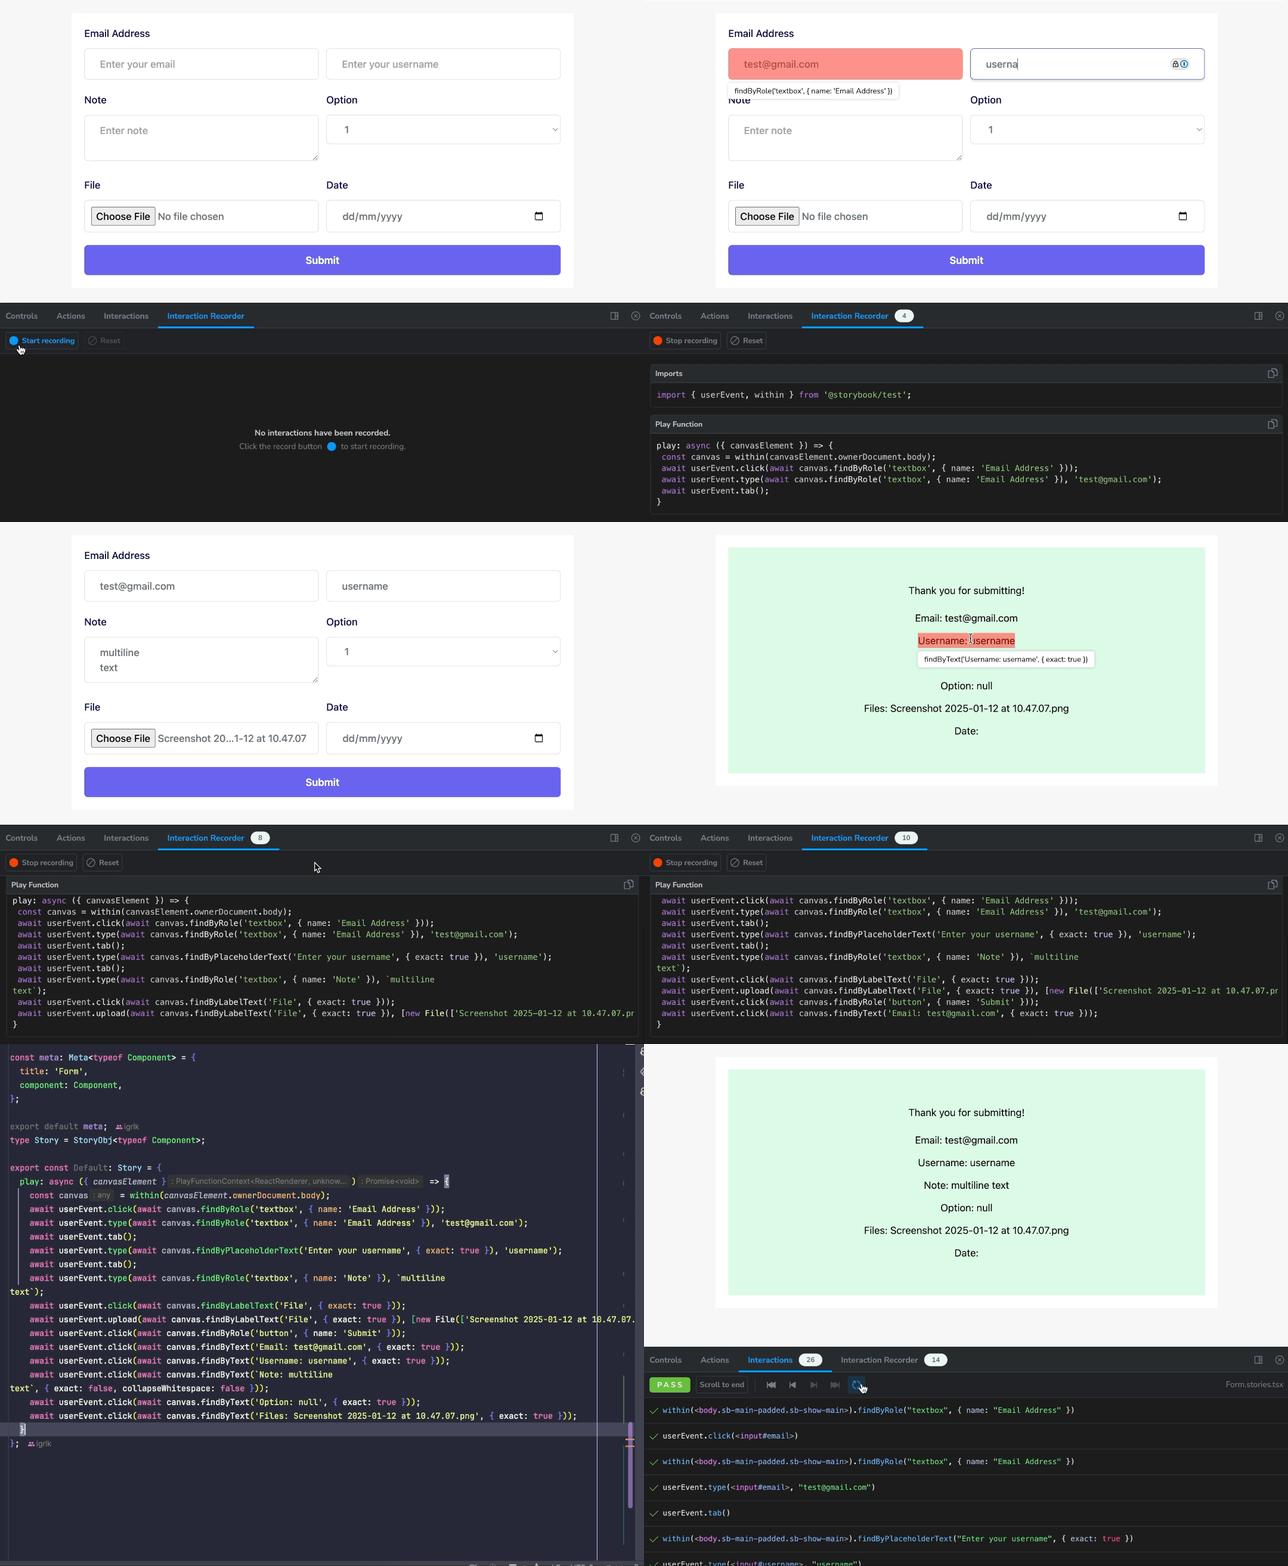
With this addon, simply turn on the recording and interact with your stories. And the addon will generate a test code for you!
### How does it work?
Whenever you interact with the story in recording mode, the addon determines the type of interaction and target element.
Only interactions that can be re-created using Testing Library are recorded, such as click, double click, type, and keydown (for enter and shift keys). The other interactions are ignored.
As for the target element, the algorithm prioritises aria-role, label, placeholder, text, title, and test-id and falls back to CSS selectors if none of the above can be used. (once again, according to [Testing Library's guiding principles](https://testing-library.com/docs/guiding-principles/))
### Do I just copy the code as is?
While the idea of the library is that it should be enough to copy the code as is, you may still want to make some changes, such as adding assertions and reformatting the code.
### How do we assert dynamic elements?
If you want to assert that the element is displayed, click on it during the recording.
Then, when the test is generated, you can change the code from `await user event.click(...)` to `await expect(...).toBeInTheDocument()` as long as the test still works as expected, and this click wasn't a required interaction. Add `expect` before or after the `click` if the interaction was needed.
## Catching visual changes too
Interaction tests like the one above check that your component **behaves** correctly. But they say nothing about how it **looks** - a broken layout, a wrong color, or an overlapping element sails through an interaction test.
That is what [visual regression testing](https://uiverify.ai/blog/storybook-visual-testing-without-chromatic) covers: it screenshots each Storybook story and flags the pixels that changed. It pairs naturally with the tests above - same stories, one checks behavior, the other checks appearance. I am now building [UI Verify](https://uiverify.ai) to do exactly this for Storybook (and Playwright), with an AI judge that tells an intended change from a real regression.
## Lastly
Writing tests is crucial for stable software. But it **takes time**. To keep up with the pace of development, we need to automate this process as much as possible.
That is where [Storybook Test Codegen](https://www.npmjs.com/package/storybook-addon-test-codegen) comes in handy. Give it a try and let me know what you think!
## Useful resources:
- [Why you MUST write automated tests](https://hackernoon.com/stable-software-learn-about-the-power-of-automated-tests)
- [Storybook](https://storybook.js.org/docs) and [Storybook Interaction Testing](https://storybook.js.org/docs/7/writing-tests/interaction-testing)
- [Storybook Test Codegen](https://www.npmjs.com/package/storybook-addon-test-codegen)
- [Testing Library's guiding principles](https://testing-library.com/docs/guiding-principles/)
---
# Don't build an AI project without reading this.
Source: https://igorluchenkov.com/blog/dont-build-ai-project-without-reading-this
Are you excited about ChatGPT's capabilities, or have you just finished your ML course and are ready to use these technologies to build a cool feature?
In both cases, you **must know** what challenges await you when building your first AI-powered feature. _I wish I had known all of this a year ago._
## First things first, are you sure you need AI?
Google's [rules-of-ml](https://developers.google.com/machine-learning/guides/rules-of-ml) suggest starting with a simple algorithm based on heuristics that will do the job and move to a machine-learning solution only when the heuristics become complex to maintain.
Adding AI to solve a problem brings additional challenges you have to deal with, such as:
- **Explainability** - why does the solution work this way for a customer
- **Data Privacy** - are there any 3rd party solutions that process customer's sensitive data
- **Maintenance/implementation cost** - the thing you build won't likely have the best target performance from day 1, and you'll have to spend more time improving the model
## No planning = no success
What is the project about? What customer problem will it solve? What metrics do we expect to improve? What are known system limitations?
Before implementing, it is essential to have answers to all of these questions. The more potential pitfalls you identify during the planning, the better, as the [cost of change](https://www.yslingshot.com/time-vs-cost/) is relatively low at this stage.
## Where are the notes?
You should document everything—problem statement, metrics, desired outcomes, test cases, research log, design document, milestones.
Writing documents allows you to keep fewer things in mind. Other people can join your project quickly or use the results of your work in different activities.
## Start small and simple
By keeping the first version of the feature simple, you can build it quickly, measure the impact, learn the insights, and continue iterating. Building a small thing also allows you to establish a baseline performance that you will improve in further iterations.
Creating a system that does many things and handles all possible use cases is an exciting challenge. However, [making a skateboard](https://blog.crisp.se/2016/01/25/henrikkniberg/making-sense-of-mvp) is always good before building a car.
## Have you done your research?
If the problem is new to the field and no one has solved it yet, consider researching it. You want to test whether solving the problem is feasible.
The research result is a minimal working prototype showing that an **algorithm can solve the problem**. Research can also show that there is **no feasible solution**, which is excellent learning—that's why you do this step at the beginning of the project.
## Do not overestimate!
Your proof-of-concept may look fantastic and create hype, but there is a lot of work between the prototype and the production-grade solution that works for all users.
When working with new technology, the best thing you can do is **avoid promising to get things done quickly**. Take your time, get familiar with the technology and the problem space, split the work into multiple small milestones and estimate them separately.
When you notice that something doesn't go according to plan, communicate with the team and make sure everyone understands that the timeline/project has changed.
## Write tests
You must apply the same software engineering principles when developing with AI. Your solution will evolve, and you must ensure it works as expected. [Automated tests](https://hackernoon.com/stable-software-learn-about-the-power-of-automated-tests) reduce the time spent manually testing things and give you more time to focus on the problem and solution.
## Time for sad news...
Even after months of hard work, your model may perform poorly. This can be frustrating, but it's a part of the ML development process. You must accept that failure is possible and prepare to pivot your approach if necessary.
The important thing to remember is that every failure is an opportunity to learn and improve for the future.
## Conclusion
Building an AI-powered feature requires careful planning, research, and implementation. It is crucial to start small, document everything, and communicate regularly with the team. And always remember to assess whether AI is necessary before implementing anything.
Remember that failure is possible, but it's an opportunity to learn and improve. **The only people who never fail are those who never try.**
## Useful resources:
- [Why you MUST write automated tests](https://hackernoon.com/stable-software-learn-about-the-power-of-automated-tests)
- [Rules of ML](https://developers.google.com/machine-learning/guides/rules-of-ml) _by Martin Zinkevich, Google_
- [How Cost of Development Changes over Time](https://www.yslingshot.com/time-vs-cost/)
- [Making sense of MVP](https://blog.crisp.se/2016/01/25/henrikkniberg/making-sense-of-mvp) _by [Henrik Kniberg](https://blog.crisp.se/author/henrikkniberg)_
---
# Stable Software: The Power of Automated Tests
Source: https://igorluchenkov.com/blog/automated-testing
### This article is worth your attention if you
* Are passionate about writing good quality software and want to enhance the stability of your app with tests.
* Are tired of unexpected bugs popping up in your production systems.
* Need help understanding what automated tests are and how to approach them.
## Why do we need automated tests?
As engineers, we want to **build things that work**, but with each new feature we create, we inevitably increase the size and complexity of our apps.
As the product grows, it becomes more and more time-consuming to **manually** (e.g. with your hands) test every functionality affected by your changes.
The absence of automated tests leads to us either spending too much time and slowing our shipping speed down or spending too little to save the velocity, resulting in new bugs in the backlog along with the late-night calls from PagerDuty.
On the contrary, **computers can be programmed to do the same repeatedly**. So, **let's delegate testing to computers!**
---
## Types of tests
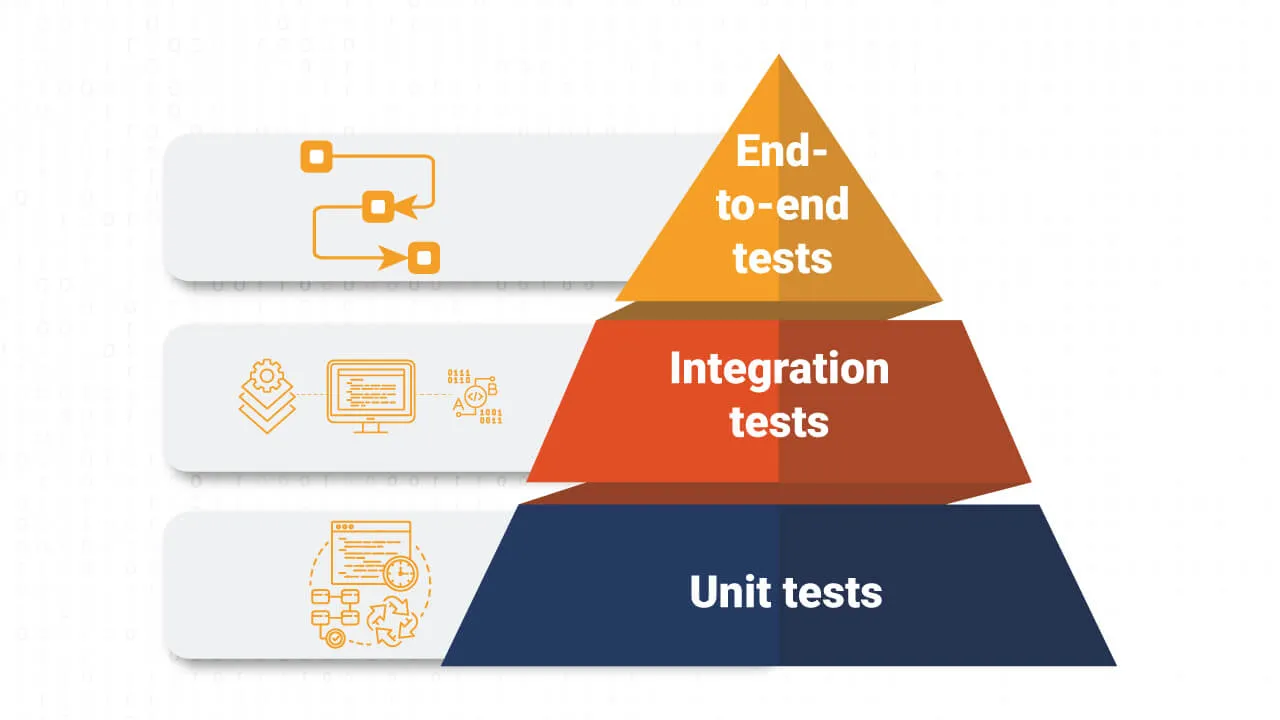
The [Testing pyramid idea](https://martinfowler.com/articles/practical-test-pyramid.html) suggests **three main types of tests: unit, integration, and end-to-end**. Let's dive deep into every kind and understand why we need each.
### Unit tests
A **unit** is a small piece of logic you test in **isolation** (without relying on other components).
**Unit tests are fast**. They finish within seconds. **Isolation** allows them to run them at any point in time, locally and on CI, without spinning up the dependent services / making API and database calls.
**Unit test examples:** A function that accepts two numbers and sums them together. We want to call it with different arguments and assert that the returned value is correct.
```javascript
// Function "sum" is the unit
const sum = (x, y) => x + y
test('sums numbers', () => {
// Call the function, record the result
const result = sum(1, 2);
// Assert the result
expect(result).toBe(3)
})
test('sums numbers', () => {
// Call the function, record the result
const result = sum(5, 10);
// Assert the result
expect(result).toBe(15)
})
```
A more interesting example is the React component that renders some text after the API request is finished. We need to mock the API module to return the necessary values for our tests, render the component and assert the rendered HTML has the content we need.
```javascript
// "MyComponent" is the unit
const MyComponent = () => {
const { isLoading } = apiModule.useSomeApiCall();
return isLoading ? Loading...
: Hello world
}
test('renders loading spinner when loading', () => {
// Mocking the API module, so that it returns the value we need
jest.mock(apiModule).mockReturnValue(() => ({
useSomeApiCall: jest.fn(() => ({
// Return "isLoading: false" for this test case
isLoading: false
}))
}))
// Execute the unit (render the component)
const result = render(` tag, are great candidates for unit tests. Units are perfect if you follow the [Test Driven Development](https://martinfowler.com/bliki/TestDrivenDevelopment.html) approach.
---
## What's next?
**Write some tests!** (but start small)
* **Install a testing framework** that suits your project/language. Each language has a popular library for testing, such as [Jest](https://jestjs.io/)/[Vitest](https://vitest.dev/) for JavaScript, [Cypress](https://www.cypress.io/)/[Playwright](https://playwright.dev/) for end-to-end (uses JavaScript as well), [JUnit](https://junit.org/junit5/) for Java, etc.
* Find a small function in your project and write a **unit** test for it.
* Write an **integration** test for some component/service-database interaction
* Choose a critical scenario that can be quickly tested, such as a simple login flow, and write an **end-to-end** test for that
Do the things above once to understand how it works. Then, do it again during some feature/bug work. Then share it with your colleagues so that you all write tests, save time and sleep better at night!
---
## Useful resources:
* [The Practical Test Pyramid](https://martinfowler.com/articles/practical-test-pyramid.html) by [Ham Vocke](https://hamvocke.com/)
* [Test Driven Development](https://martinfowler.com/bliki/TestDrivenDevelopment.html) by [Martin Fowler](https://martinfowler.com/)